The Battle of Iwo Jima: A Map-Driven Analysis
Related Articles: The Battle of Iwo Jima: A Map-Driven Analysis
Introduction
In this auspicious occasion, we are delighted to delve into the intriguing topic related to The Battle of Iwo Jima: A Map-Driven Analysis. Let’s weave interesting information and offer fresh perspectives to the readers.
Table of Content
The Battle of Iwo Jima: A Map-Driven Analysis
The Battle of Iwo Jima, fought between February and March 1945, stands as a stark testament to the brutal realities of World War II. This 36-day struggle, waged on a volcanic island in the Pacific, pitted American forces against the entrenched Japanese defenders, resulting in a bloody and costly victory for the Allies. Understanding the topography and strategic significance of Iwo Jima requires a careful examination of its map, which reveals the intricate details of the battle’s unfolding.
The Island’s Topography: A Fortress of Fire and Stone
Iwo Jima, a mere eight miles long and two miles wide, is a volcanic island characterized by its rugged terrain. The island’s highest point, Mount Suribachi, rises dramatically from the southern tip, providing a commanding view of the surrounding area. The island is also crisscrossed by numerous volcanic ridges and craters, forming a complex network of natural defenses. This terrain, coupled with the Japanese defenders’ extensive network of caves, tunnels, and fortifications, turned Iwo Jima into a formidable stronghold.
Strategic Importance: A Stepping Stone to Japan
The island’s strategic significance stemmed from its proximity to Japan, making it a crucial airbase for American B-29 Superfortress bombers. Iwo Jima’s location allowed for the establishment of a staging ground for air operations against the Japanese mainland, shortening the flight time for bombers and reducing the risk of losses over enemy territory. Capturing Iwo Jima was therefore a critical step in the Allied strategy to bring the war to a swift conclusion.
The Map’s Unveiling: A Visual Narrative of the Battle
The map of Iwo Jima becomes a vital tool for understanding the battle’s progression. It reveals the locations of key defensive positions, landing beaches, and the major battlefields.
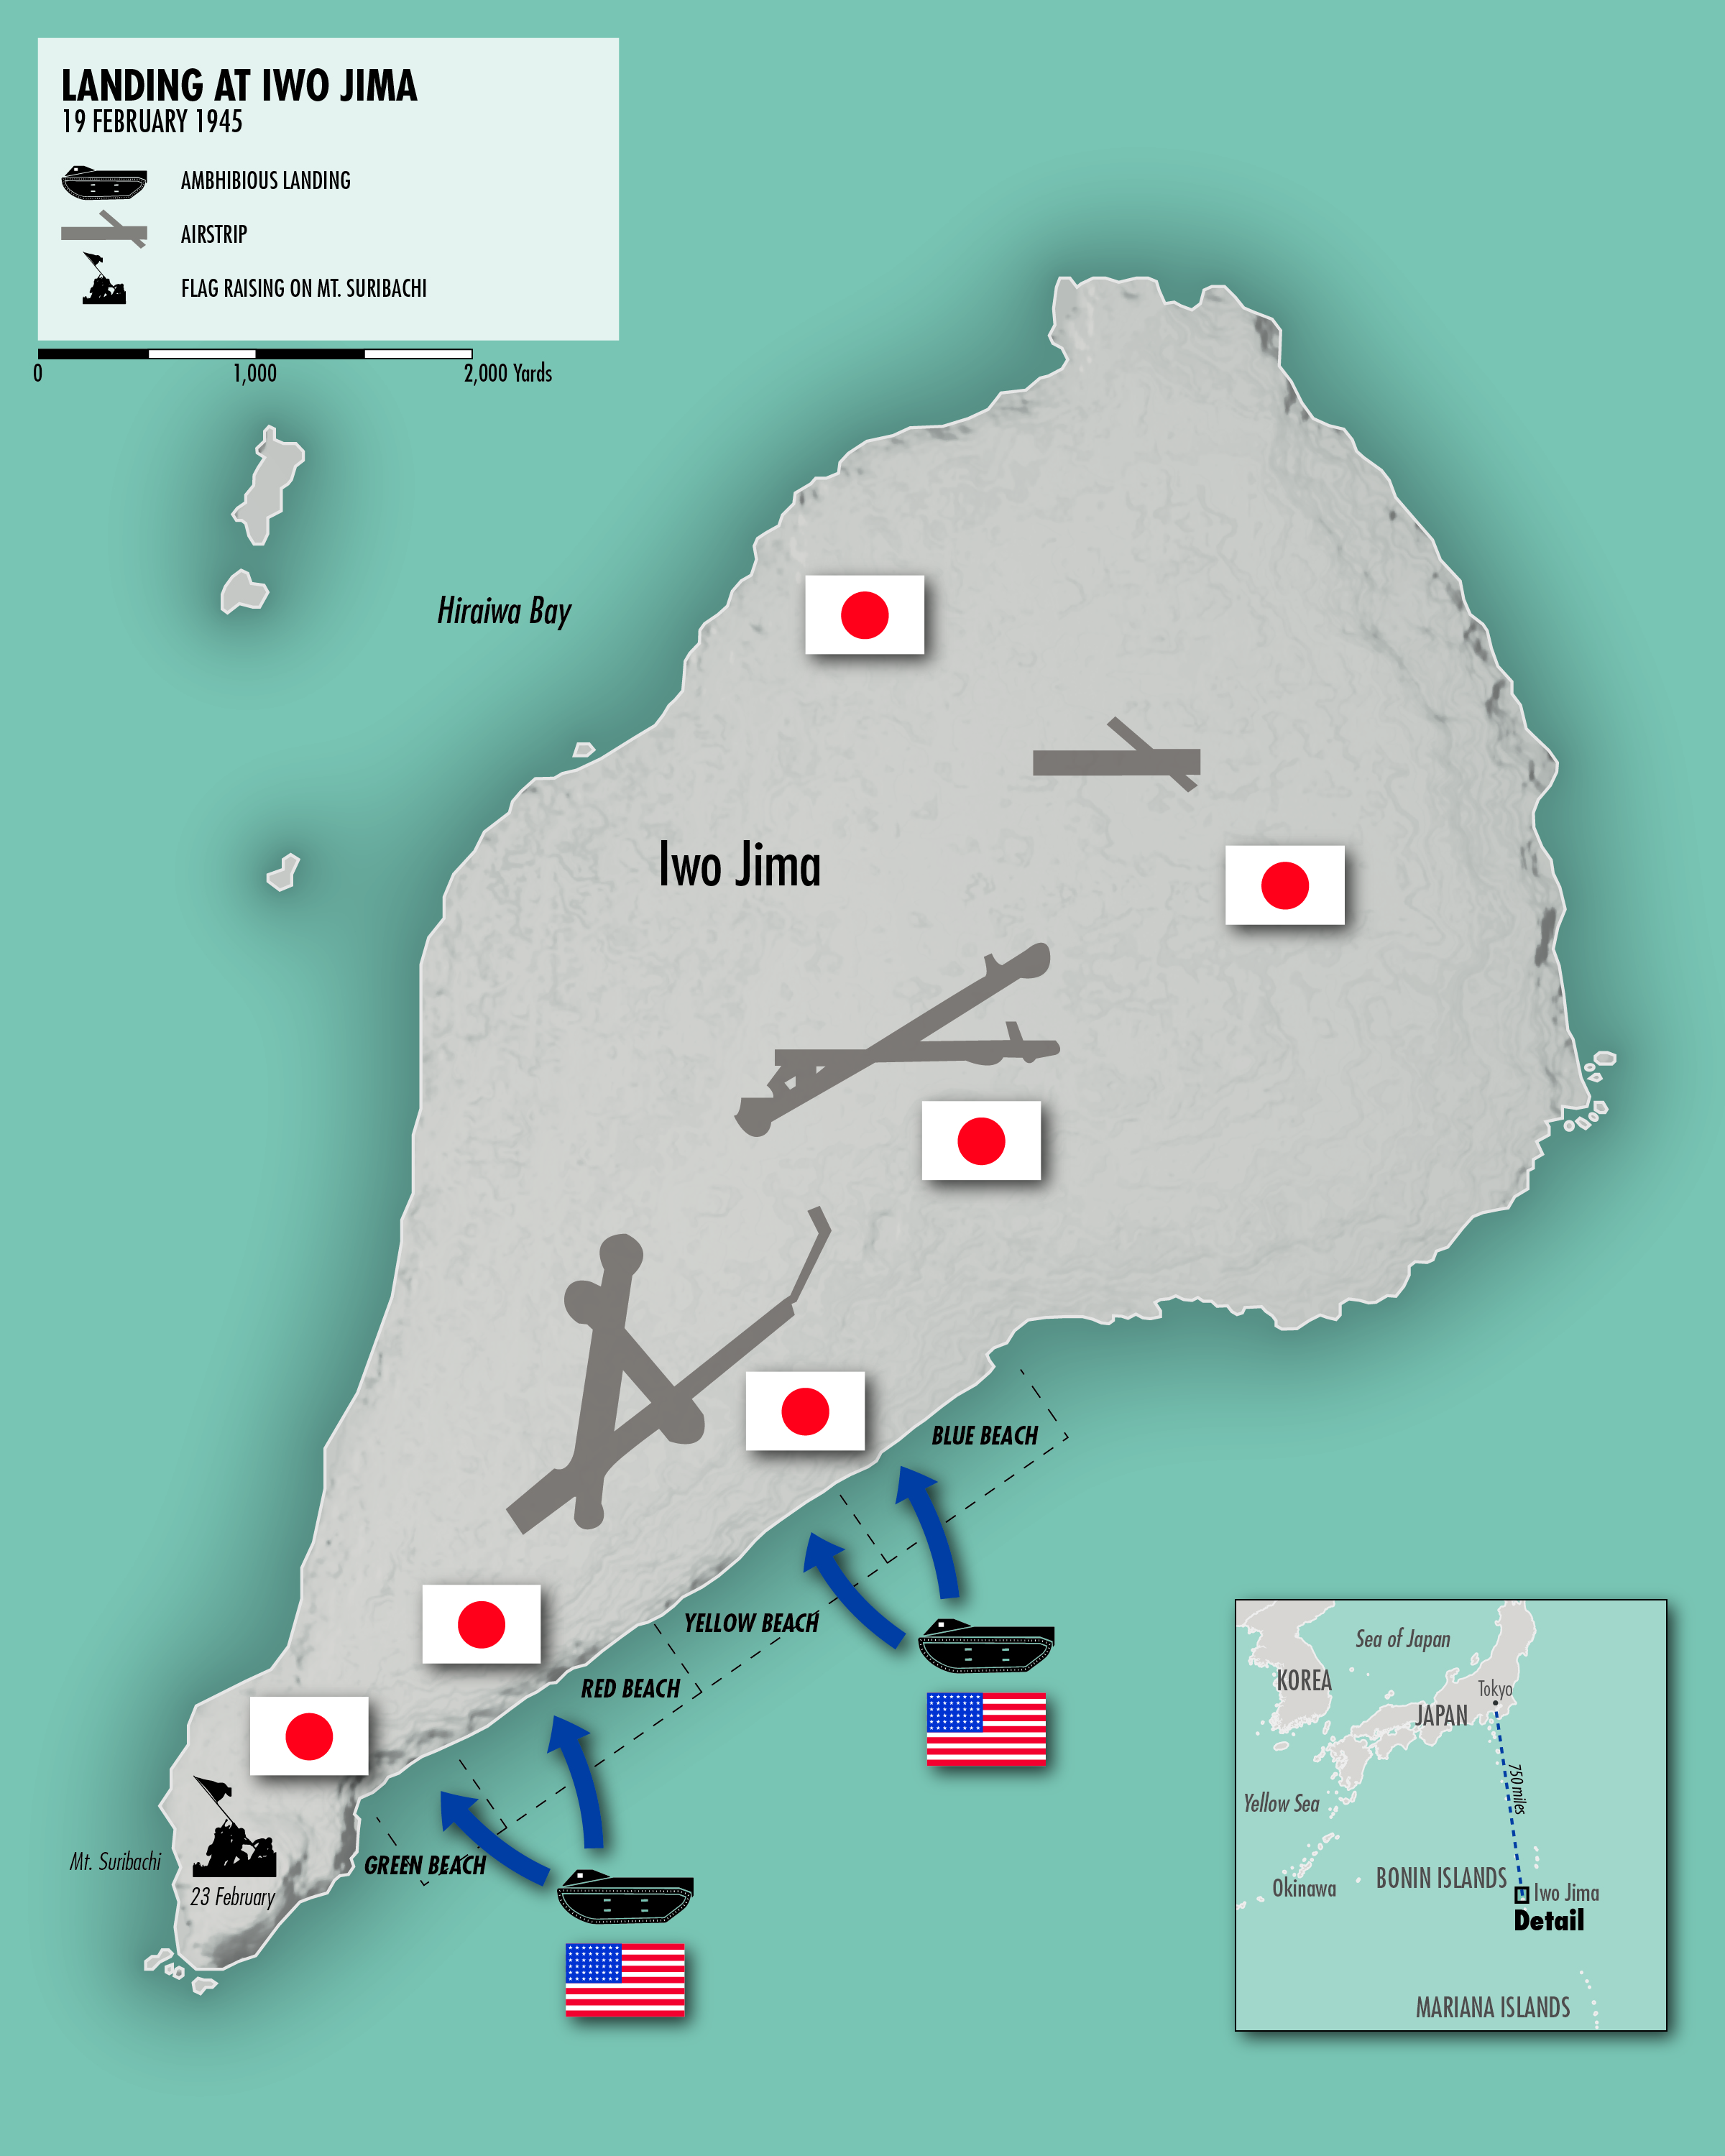
- The Landing Beaches: The Americans landed on five beaches, designated as Red, Yellow, Green, Blue, and Purple. The beaches were chosen for their relative flatness and accessibility, despite being heavily fortified by the Japanese.
- Mount Suribachi: This iconic peak became a symbol of the battle. The Japanese had fortified its slopes with numerous pillboxes, machine gun nests, and artillery positions, making its capture a crucial objective for the Americans. The iconic photograph of American Marines raising the flag on Mount Suribachi captures the symbolic significance of this hard-won victory.
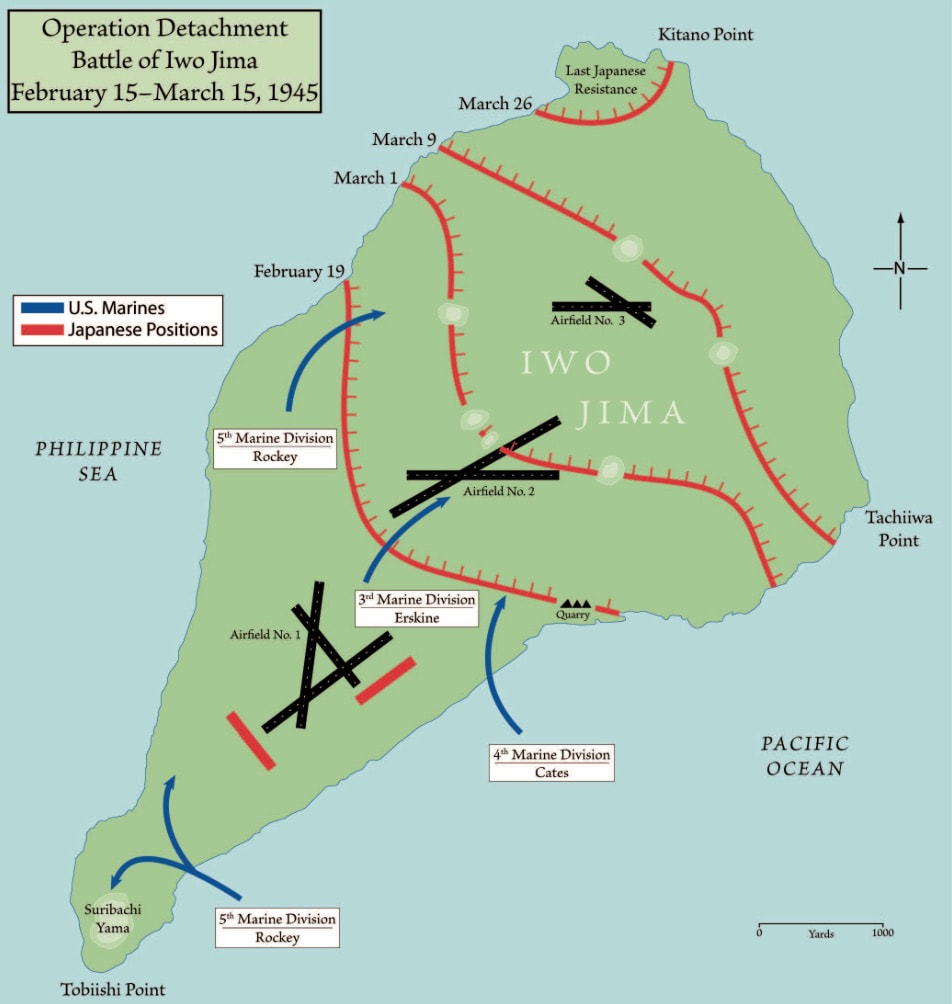
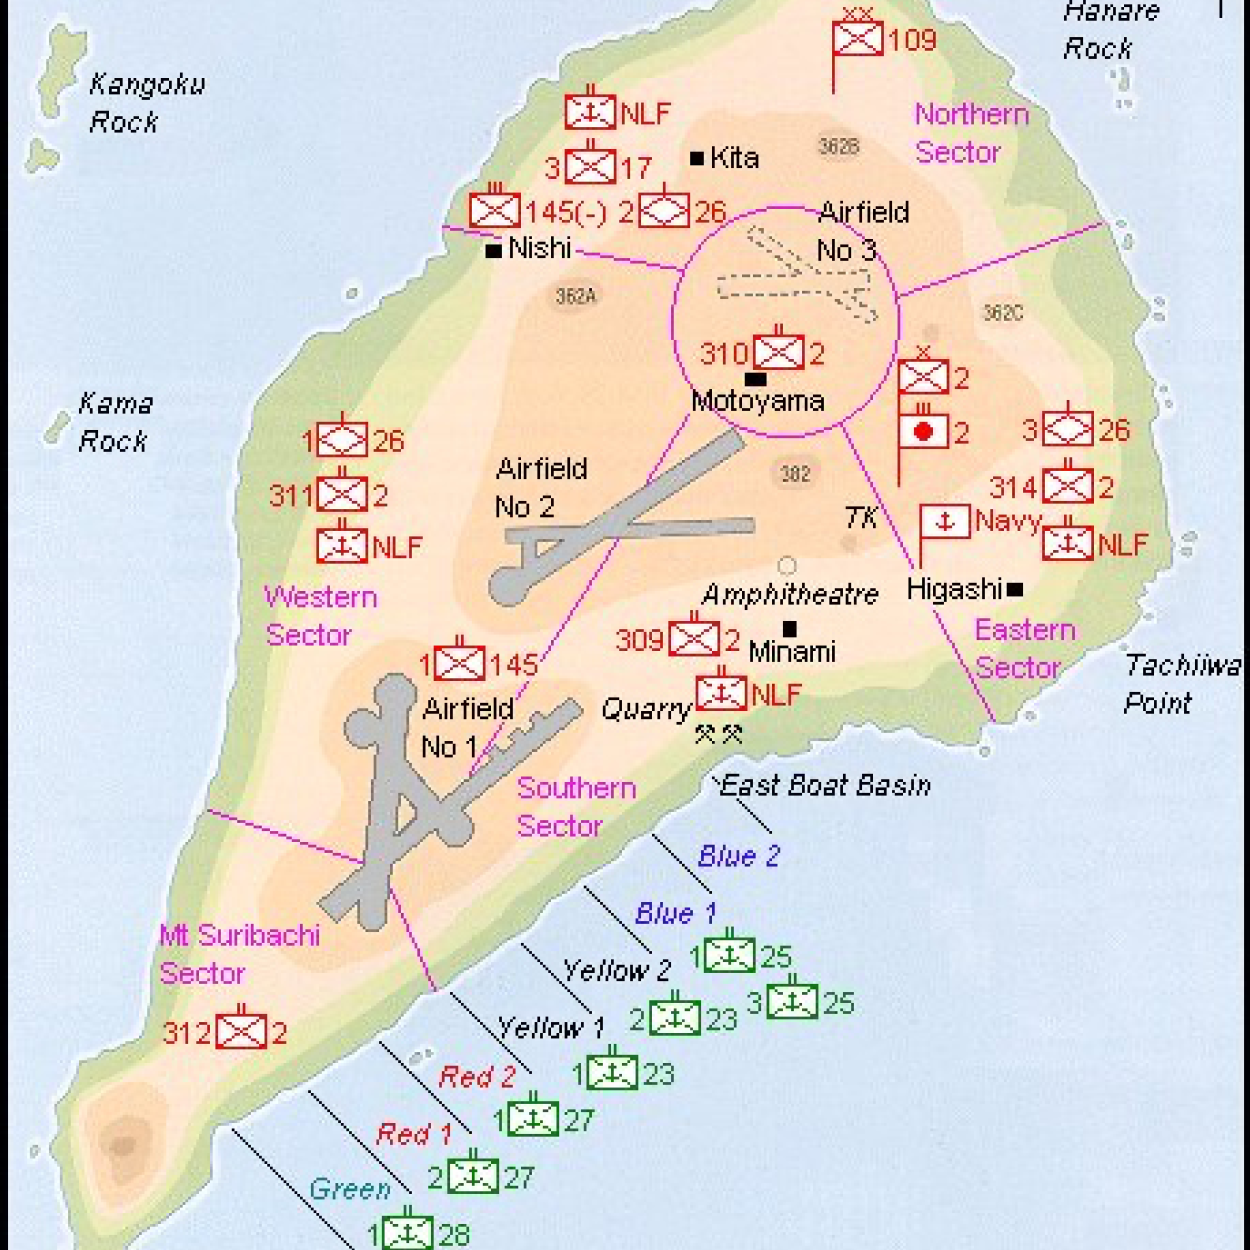
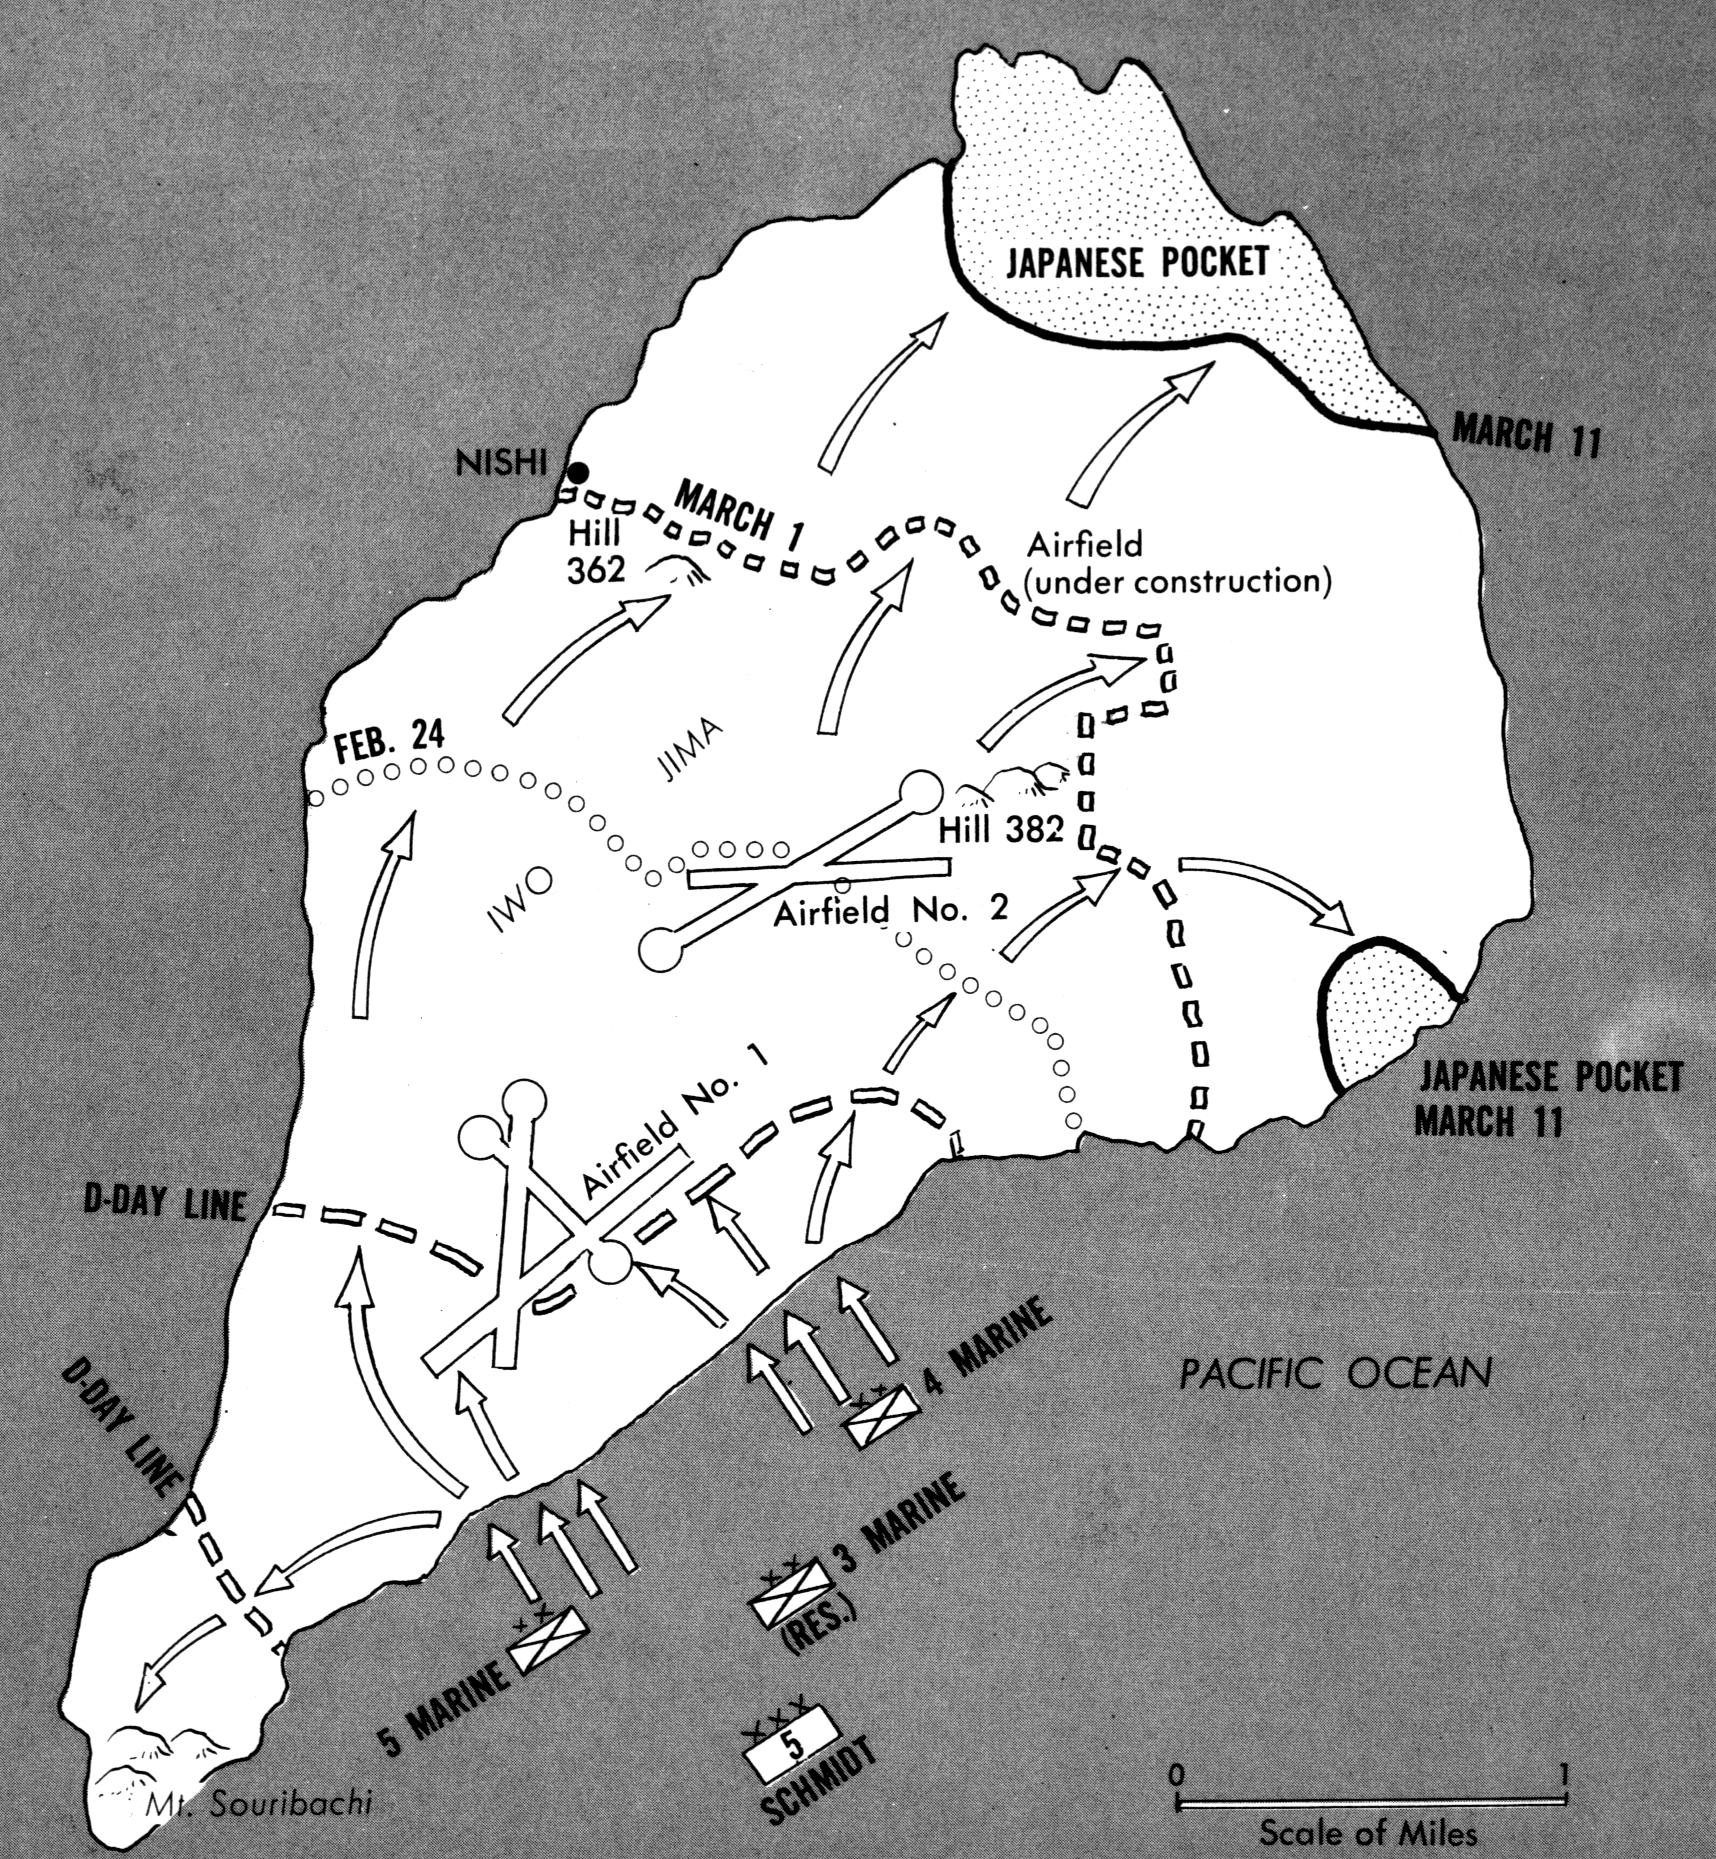
- The Central Plateau: This rugged area, north of Mount Suribachi, was the site of the most intense fighting. It was heavily defended by the Japanese, who utilized their extensive network of caves and tunnels to wage a protracted defense.
- The Northern End: The northern end of the island, dominated by volcanic ridges and craters, was a secondary battleground. While less heavily fortified than the central plateau, it still presented significant challenges to the American advance.
The Battle’s Progression: A Story of Grit and Determination
The map reveals the brutal reality of the battle, highlighting the slow and costly advance of the American forces. The initial landings were met with fierce resistance, and the fighting was often hand-to-hand, marked by intense artillery bombardments and close-quarter combat. The Japanese, utilizing their superior knowledge of the terrain and their fanatical defense, inflicted heavy casualties on the Americans.
The battle was characterized by a series of brutal engagements, with the Americans gradually pushing back the Japanese defenders. The capture of Mount Suribachi, while a significant victory, did not mark the end of the fighting. The Japanese defenders, entrenched in their network of caves and tunnels, continued to resist fiercely.
The Cost of Victory: A Heavy Toll
The Battle of Iwo Jima was one of the bloodiest battles in the Pacific Theater. The Americans suffered over 26,000 casualties, including nearly 7,000 killed. The Japanese defenders suffered even heavier losses, with an estimated 21,000 killed. The map, with its markings of battlefields and casualty zones, serves as a grim reminder of the human cost of this strategic victory.
FAQs by Map of Iwo Jima Battle:
Q: What was the significance of Mount Suribachi in the Battle of Iwo Jima?
A: Mount Suribachi, the island’s highest peak, was strategically important due to its commanding view of the surrounding area. The Japanese fortified it heavily, turning it into a crucial defensive position. Its capture was a significant victory for the Americans, symbolizing the progress made in securing the island.
Q: Why was Iwo Jima so difficult to capture?
A: Iwo Jima’s rugged terrain, coupled with the Japanese defenders’ extensive network of caves, tunnels, and fortifications, made the island a formidable stronghold. The Japanese, fighting for their homeland and employing a fanatical defense, inflicted heavy casualties on the Americans.
Q: What were the key factors that contributed to the American victory at Iwo Jima?
A: The American victory at Iwo Jima was achieved through a combination of factors, including superior firepower, relentless determination, and the strategic use of air and naval support. The American forces also benefited from their superior logistical capabilities, allowing them to sustain their offensive despite heavy casualties.
Tips by Map of Iwo Jima Battle:
- Use the map to trace the progression of the battle: By following the movement of troops and the capture of key locations, one can gain a deeper understanding of the battle’s unfolding.
- Focus on the key strategic points: Mount Suribachi, the central plateau, and the landing beaches represent crucial areas of contention. Understanding the significance of these locations helps to grasp the battle’s strategic context.
- Consider the human cost: The map should not only be seen as a representation of military strategy but also as a reminder of the human cost of war. The battle’s casualties are a stark testament to the sacrifices made by both sides.
Conclusion by Map of Iwo Jima Battle:
The map of Iwo Jima serves as a powerful tool for understanding the battle’s strategic complexities and the human cost of this hard-won victory. It reveals the island’s rugged terrain, the Japanese defenders’ formidable defenses, and the relentless advance of the American forces. The battle of Iwo Jima stands as a testament to the resilience of the human spirit, the brutality of war, and the importance of strategic planning in achieving victory. It serves as a reminder of the sacrifices made by those who fought and died on this volcanic island, a small but significant battleground in the grand narrative of World War II.


![Map of The Battle of Iwo Jima [1997x1531] : MapPorn](https://external-preview.redd.it/1Xb1ZxkAWKS2EBveiomiEXjNEjcCBXpsItWP0ZZPDIk.jpg?width=1200u0026height=628.272251309u0026auto=webpu0026s=1b4075d2579ae3ac64828c0539f3d49f93dca291)
Closure
Thus, we hope this article has provided valuable insights into The Battle of Iwo Jima: A Map-Driven Analysis. We thank you for taking the time to read this article. See you in our next article!